
Especially for smaller organizations the integration of Single-Sign-On (SSO) solutions seems like a overwhelming task. In consequence, like in many small business and startups I have seen, each application has its own database and authentication mechanism.
The advantages of having a central authentication system are obvious, since you get advantages like:
- Easier password management for users (they only have to remember one)
- Centralized definition of authentication policies (2FA, password requirements, e-mail validation etc.)
- Managing on- and offboarding members and changing roles means less administration overhead if you only have to do it in one place
Nevertheless I usually hesitated to introduce SSO and Directory Services for small teams, since the prominent solutions like an OpenLDAP or Windows AD were way to heavyweight and complex to setup and the productive gain wouldn’t justify the invested time.
I am aware, that there are some SaaS (even Google does SSO via SAML2.0) providers actually making it easy for you taking away the hosting / maintenance and giving you specific integration tutorials for their service, but giving our whole authentication and rights management to a third party in the cloud wasn’t an option for us. Security concerns aside we think that decentralization of the internet is indeed desirable.
For ctrl.alt.coop I evaluated some self-hosted solutions to see if I could get this done in a reasonable amount of time, ready to be disappointed and live with the fact that maintaining authentication in each tool would be easier in the end.
So I was positively surprised that Keycloak1, an Identity and Access Management solution by redhat, was so easy to setup that I would do it again anytime in an environment with more than one application and more than three users.
In the following I will document the steps taken to install Keycloak via docker and integrate GitLab2 . Besides the official documentation of the applications, I got my knowledge from this helpful blog post .
But first let’s install Keycloak. The machine in this tutorial runs Debian 9 (stretch).
I can haz easy deployment?
Keycloak is Java software, preferably deployed with a wildfly server. When I read that I almost discarded it, since I didn’t want to bother too much about how to properly maintain a Java stack. I basically have no knowledge about doing so and my aim in this was mainly to get something up and running with minimum effort, so learning how to properly set up a reasonably big Java stack like this was out of question. Thankfully there is a well maintained docker distribution with all necessary components bundled inside. You only have to provide a Postgres or MariaDB connection, but with docker-compose you can have that almost config-free, too.
This is my docker-compose.yml:
|
|
Although the security concept of stuff in docker containers depends on services not being exposed to any public endpoint except explicitly specified, it never hurts to change the passwords something stronger. At least the KEYCLOAK_PASSWORD should be stronger and changed immediately after startup.
I plan to run Keycloak behind an nginx reverse proxy, therefore the PROXY_ADDRESS_FORWARDING: "true" and the mapping of
port 8080 inside the container to a port of your choice in localhost is needed. I took 10080.
All application data is stored in the postgres database so mounting the container volume /var/lib/postgresql/data
to some local folder can make it easy to backup all necessary data. It’s not mandatory but if you do, make sure that
the folder has proper permissions - remember, all your authentication data will be in there.
Systemd and docker-compose
Of course you can just start this with docker-compose up in foreground, or with docker-compose start
detached from your ssh session, but I want to have my docker-compose stacks integrated with systemd, so
there is only one place where I configure all services on this system.
Take a look at this unit file I placed under /etc/systemd/system/docker-compose@.service.
|
|
This unit file allows you to control any docker-compose.yml file placed in /opt/docker/compose/<service name>.
In this case we have it placed in /opt/docker/compose/keycloak and these regular systemd commands get it up and running.
|
|
Reverse proxy
Last but not least we need to expose Keycloak to the public, where I chose to use a nginx reverse proxy, since I like to have my webserver configuration and ssl termination in one place. So this is a pretty standard nginx reverse proxy config:
|
|
Note that in in this example I used the certbot3 from letsencrypt4 to obtain SSL Certificates.
Also every http request is redirected to the https endpoint, which is desirable in any case,
but absolutely necessary for authentication services like this one. In this case the proxy traffic doesn’t leave
the host, so having the proxy_pass communicate via http shouldn’t be an issue. If you plan to do that over
insecure networks (most are!), you should make sure that you use https for that too. You now should be able to login
under https://auth.domain.com with the admin default credentials from your docker-compose.yml.
You now should change the password. Important: Do not delete your admin account even though you plan to use another
account for administration - the docker script would recreate admin with the default password!
Keycloak login screen
Integrate GitLab
On to GitLab. I assume you have a GitLab installed with their “Omnibus” distribution. I only going to cover the Keycloak side of the confguration since GitLab is covering SAML pretty well in their docs .
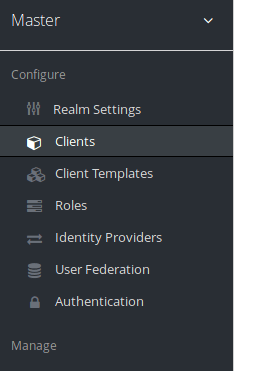
Keycloak menu
First of all you need to create a client, so click on the Clients menu entry in the sidebar on the left. You should see a list of some default clients (The admin console itself for example is also just a client) and in the upper right corner of the table a create button. Click that. Some SAML2.0 client applications provide an option to generate an XML file to ease provisioning, therefore you see a field where you can upload this file. Unfortunately GitLab doesn’t. But we do! So download this file adjust it to your domain and import it. Afterwards do not forget to generate new keys in the SAML Keys tab. Then proceed here . Or fill out the form like shown in the images below (adjusted with your domain of course).
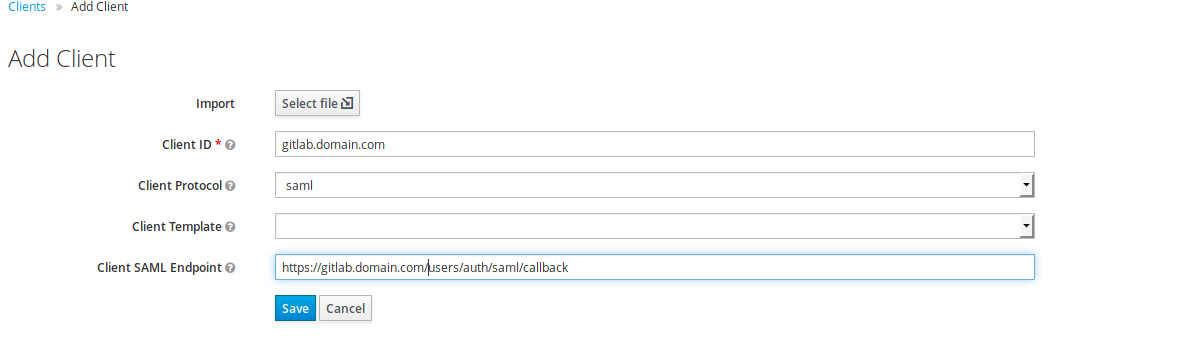
Create a client

GitLab client config page 1
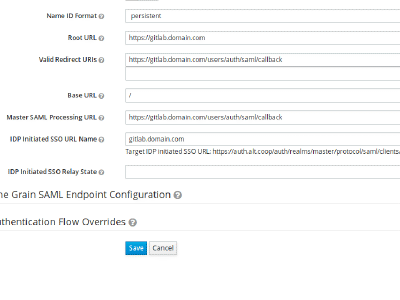
GitLab client config page 2
When authenticating with a third party, some fields have to be matched between application and identity provider. Therefore we need to set up some mapping in the “Mapping”-Tab. See images below.
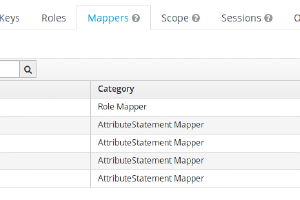
mapper tab
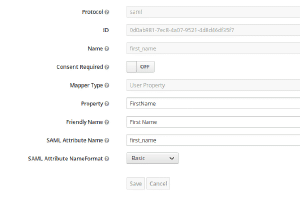
first name mapper
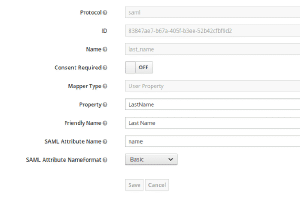
last name mapper
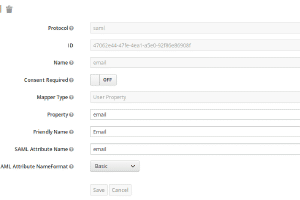
email mapper
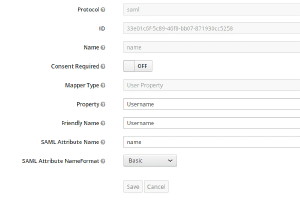
user name mapper
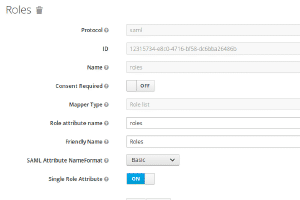
roles mapper
certificate
Finally, to ensure authenticity of the Identity provider GitLab needs to know about keycloak’s cert. You find it in Realm Settings -> Keys. You should find a row with Type RSA.
Click on “Certificate” in the most right column and you get the public key which you will need for the SAML config in /etc/gitlab/gitlab.rb
which should now look similar to this:
gitlab_rails['omniauth_enabled'] = true
gitlab_rails['omniauth_allow_single_sign_on'] = ['saml']
gitlab_rails['omniauth_providers'] = [
  {
          name: 'saml',
          args: {
                  assertion_consumer_service_url: 'https://gitlab.domain.com/users/auth/saml/callback',
                  idp_cert: '[very long certificate string]'
                  idp_sso_target_url: 'https://auth.domain.com/auth/realms/master/protocol/saml/clients/gitlab.domain.com',
                  issuer: 'gitlab.domain.com',
                  attribute_statements: {
                        first_name: ['first_name'],
                        last_name: ['last_name'],
                        name: ['name'],
                        username: ['name'],
                        email: ['email']
                  },
                  name_identifier_format: 'urn:oasis:names:tc:SAML:2.0:nameid-format:persistent'
          },
          label: 'auth.domain.com auth',
          groups_attribute: 'roles',
          external_groups: ['gitlab.domain.com:external'],
  }
]
On your GitLab login screen you should now see a new option to authenticate with your new Keycloak service. If so: Congratulations!
At ctrl.alt.coop we now have several services hooked up to Keycloak making authentication way more joyful. For instance we authenticate Nextcloud, Redmine and even SSH via federated LDAP. So far I definitely would endorse Keycloak as a simple SSO Solution.